The Canon AE-1 Program, a classic 35mm SLR, boasts readily available instruction manuals via the Internet Archive, offering free downloads and streaming options.
What is the Canon AE-1 Program?

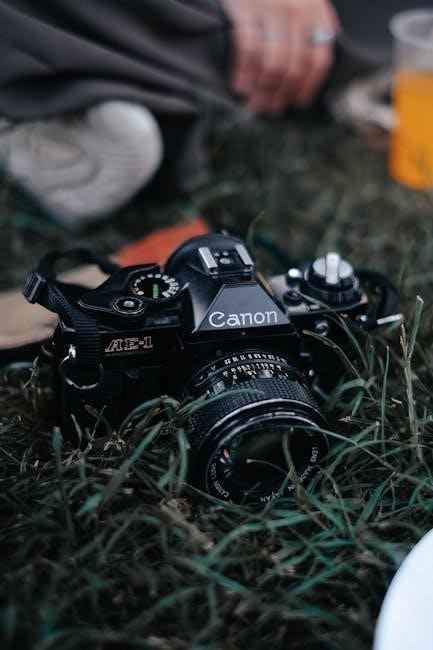
The Canon AE-1 Program, launched in 1984, represents a refined iteration of the immensely popular Canon AE-1. It’s a 35mm single-lens reflex (SLR) camera celebrated for its user-friendliness and robust build quality. Crucially, the “Program” designation signifies its inclusion of a programmed auto-exposure mode, simplifying photography for enthusiasts.
Numerous resources, including comprehensive instruction manuals, are freely accessible online through platforms like the Internet Archive. These manuals, available for download, borrowing, or streaming, detail every facet of the camera’s operation. They cover everything from basic functions to advanced techniques, making the AE-1 Program exceptionally approachable for both beginners and experienced photographers seeking a reliable, fully-featured film camera; Service manuals are also available for those inclined towards repair and maintenance.
Key Features and Specifications
The Canon AE-1 Program distinguishes itself with a sophisticated electronic shutter, offering speeds from 2 seconds to 1/1000th of a second, plus bulb mode. Its programmed auto-exposure mode automatically selects both aperture and shutter speed, while shutter priority allows user control over shutter speed. Manual mode provides complete creative control;
The camera utilizes Canon’s FD mount, compatible with a wide array of Canon FD lenses. Detailed specifications and operational guidance are extensively documented in freely available instruction manuals found on the Internet Archive. These resources outline the camera’s metering system, film speed range (ISO 25-3200), and power source – typically four AA batteries. The manuals also cover the self-timer, depth-of-field preview, and various other functionalities.
Why Choose the Canon AE-1 Program?
The Canon AE-1 Program presents a compelling entry point into film photography, blending user-friendliness with robust functionality. Its programmed mode simplifies shooting, while offering the flexibility of shutter priority and full manual control for experienced photographers. Abundant, freely accessible instruction manuals on platforms like the Internet Archive ensure easy learning and troubleshooting.
The camera’s FD lens mount provides access to a diverse and often affordable range of lenses. Furthermore, the AE-1 Program’s durable build quality ensures longevity. Choosing this camera means joining a community supported by extensive documentation and readily available resources, making it an ideal choice for both beginners and enthusiasts seeking a classic photographic experience.

Understanding the Camera Body
The Canon AE-1 Program’s body features intuitive controls, detailed in available manuals, facilitating easy operation and a comfortable grip for extended shooting sessions.
Front View: Buttons and Dials
Examining the Canon AE-1 Program’s front panel reveals key operational elements. The lens mount, accepting Canon FD lenses, is central, while the self-timer button initiates a delayed shutter release. Adjacent to the lens mount, you’ll find the aperture index mark, crucial for manual focusing and depth-of-field control.
The film rewind knob and rewind release button are positioned on the left, enabling film rewinding after exposure. Notably, the AE-1 Program lacks direct aperture control on the lens itself; aperture is adjusted via the camera body’s controls. Instruction manuals detail the precise function of each component, guiding users through proper operation and ensuring optimal photographic results. Understanding these front-facing features is fundamental to mastering the camera.
Back View: Controls and Displays
The rear of the Canon AE-1 Program houses essential controls for operation and monitoring. The film door release latch allows access for film loading and unloading, a process detailed in the instruction manual. The frame counter displays the number of exposures taken, aiding in tracking film usage.
Crucially, the back panel features the electronic viewfinder, displaying shutter speed, aperture, and exposure indicators. The mode dial selector, allowing switching between Program, Shutter Priority, and Manual modes, is also located here. The instruction manual emphasizes the importance of understanding these displays for accurate exposure control. Additionally, a diopter adjustment dial corrects for individual vision differences, ensuring a clear viewfinder image.
Top View: Film Advance and Shutter Speed
The Canon AE-1 Program’s top plate presents key operational elements. The film advance lever, when wound, both advances the film and cocks the shutter, a process thoroughly explained in the instruction manual. Adjacent to this is the rewind crank, used to rewind the film back into its cassette after exposure.
The electronic shutter speed dial is a prominent feature, offering a range from 2 seconds to 1/1000th of a second in Program and Shutter Priority modes. In Manual mode, the dial provides full control. The instruction manual stresses the relationship between shutter speed and aperture for proper exposure. The hot shoe for external flash attachment is also situated on the top plate, enhancing photographic versatility.
Bottom View: Battery Compartment and Tripod Socket
The Canon AE-1 Program’s underside houses essential components for power and stability. A securely latched battery compartment accepts four AA-size batteries, powering the camera’s electronic functions – detailed battery installation instructions are found within the manual. The manual emphasizes using fresh batteries for optimal performance and accurate metering.
Centrally located is a standard 1/4-inch tripod socket, enabling secure mounting to a tripod for steady shots, particularly crucial in low-light conditions or for long exposures. The instruction manual advises on selecting a compatible tripod and proper mounting techniques. Proper battery installation and tripod use are fundamental for reliable operation, as highlighted in Canon’s documentation.
Loading and Unloading Film
The Canon AE-1 Program manual details a straightforward film loading process, covering compatible film types and providing step-by-step guidance for both loading and rewinding.
Film Types Compatible with the AE-1 Program
The Canon AE-1 Program, being a versatile 35mm SLR, accommodates a wide range of film types, offering photographers considerable creative flexibility. The instruction manual, readily available online through resources like the Internet Archive, confirms compatibility with standard 35mm films. This includes black and white negative film, color negative film, and color slide (transparency) film.
Specifically, ISO speeds ranging from 25 to 3200 are generally supported, allowing for shooting in diverse lighting conditions. While the camera functions optimally with these standard film types, experimentation with specialized films, such as infrared or other niche options, is possible, though results may vary. The manual doesn’t explicitly list every possible film stock, but emphasizes the importance of selecting films appropriate for the intended photographic purpose and lighting environment.
Step-by-Step Film Loading Guide
Loading film into the Canon AE-1 Program is a straightforward process, detailed in the readily accessible instruction manual. First, open the film back by lifting the film rewind knob. Next, insert the film cartridge into the film chamber. Pull the film leader across the camera body and align it with the take-up spool.
Advance the film using the film advance lever, ensuring the perforations engage with the sprockets. Close the film back securely. Continue advancing the film and pressing the shutter release button until the frame counter reaches ‘1’. The manual emphasizes gentle handling of the film to avoid damage. Proper loading ensures correct film transport and prevents potential issues during shooting. Always rewind the film completely before opening the back.
Rewinding the Film
Rewinding the film in the Canon AE-1 Program is crucial for retrieving your exposed negatives. The instruction manual details a simple procedure: locate the film rewind knob on the top of the camera. Before starting, fully depress the shutter button to disengage the film advance mechanism. Then, lift the rewind knob and turn it in the direction indicated by the arrow.
You’ll feel resistance initially, which will lessen as the film is rewound onto the take-up spool. Continue rewinding until you feel a sudden release – this indicates the film leader has fully cleared the film chamber. Open the camera back carefully to remove the film cartridge. Proper rewinding prevents light leaks and ensures your images are safely preserved.
Checking Film Advance
Regularly checking film advance with your Canon AE-1 Program is vital to avoid missed frames. The instruction manual emphasizes observing the film advance lever and the film counter. After each shot, confirm the lever has fully returned to its original position, indicating the film has advanced correctly. Simultaneously, verify the film counter has incremented by one.
If the lever doesn’t fully return, or the counter doesn’t advance, do not continue shooting. This suggests a potential issue with film loading or the advance mechanism. Gently attempt to advance the film further; if resistance persists, open the back (in subdued light) and check the film’s position. Consistent monitoring ensures you capture all intended images without gaps.

Exposure Settings and Modes
The Canon AE-1 Program offers Shutter Priority, Program (automatic), and Manual modes, detailed in its instruction manual, allowing versatile control over photographic exposure.
Shutter Priority Mode
Shutter Priority mode on the Canon AE-1 Program empowers photographers to dictate the shutter speed, while the camera automatically calculates the appropriate aperture for correct exposure. This is exceptionally useful for controlling motion – freezing action with fast shutter speeds or intentionally blurring movement with slower ones. The instruction manual details how to select your desired shutter speed using the dial, and the camera’s metering system then chooses the corresponding f-stop.
Understanding this mode is crucial for creative control. For instance, capturing a fast-moving sports event requires a rapid shutter speed to avoid blur, while photographing a flowing waterfall might benefit from a slower speed to create a silky smooth effect. The manual emphasizes observing the viewfinder’s LED indicators to confirm the chosen aperture is within the lens’s range and provides adequate depth of field for your subject.

Program Mode: Automatic Exposure
Program Mode on the Canon AE-1 Program represents the camera’s fully automatic setting, simplifying photography for beginners or situations demanding quick responses. In this mode, the camera independently selects both the optimal shutter speed and aperture based on its internal metering system. The instruction manual clarifies that Program Mode is ideal for general photography where precise control isn’t paramount, allowing the photographer to concentrate on composition and capturing the moment.
However, the manual also notes that while convenient, Program Mode offers less creative control. Photographers relinquish direct influence over depth of field and motion blur. The camera prioritizes a balanced exposure, but understanding its logic is key. The LED indicators in the viewfinder still provide exposure information, allowing users to employ exposure compensation if needed to fine-tune the results.
Manual Mode: Full Control
Manual Mode on the Canon AE-1 Program grants the photographer complete authority over both the shutter speed and aperture settings. The instruction manual emphasizes this mode’s importance for experienced users seeking creative control and precise exposure. Unlike Program Mode’s automation, Manual Mode requires the photographer to independently assess the scene’s lighting conditions and select appropriate settings.
The manual details how to utilize the camera’s metering system as a guide, observing the LED indicators in the viewfinder to achieve correct exposure. It stresses the importance of understanding the relationship between shutter speed, aperture, and ISO to achieve desired effects like motion blur or shallow depth of field. Mastering Manual Mode unlocks the full potential of the AE-1 Program, allowing for artistic expression and overcoming challenging lighting scenarios.
Exposure Compensation
Exposure Compensation on the Canon AE-1 Program allows photographers to override the camera’s automatic exposure settings when necessary. The instruction manual explains this feature is crucial for situations where the camera’s meter might be fooled by unusually bright or dark scenes. For example, shooting a snowy landscape or a dark subject against a bright background.
The AE-1 Program utilizes a +/- 2 stop exposure compensation range, adjustable via a dedicated dial. The manual details how to interpret the viewfinder’s LED indicators while using compensation, ensuring accurate exposure. It emphasizes that positive compensation brightens the image, while negative compensation darkens it. Understanding and utilizing exposure compensation is key to consistently achieving well-exposed photographs in challenging conditions, moving beyond the camera’s initial assessment.

Focusing and Metering
The Canon AE-1 Program’s manual details its focusing system and metering modes, crucial for achieving sharp, properly exposed images with ease and precision.
Autofocus System Overview
Interestingly, the Canon AE-1 Program does not feature an autofocus system. This is a key distinction from later Canon models. The camera relies entirely on manual focusing, utilizing a split-image focusing screen in the viewfinder to aid in achieving sharp images. The instruction manual thoroughly explains how to use this split-image system effectively.
Users must align the two halves of the split image to achieve focus. Once aligned, the subject appears as a single, clear image. The manual also details techniques like focus lock and recomposition, where focus is locked on a subject before recomposing the shot. Understanding depth of field is also crucial for manual focusing, and the manual provides guidance on controlling this aspect of image sharpness. Mastering these manual techniques is essential for successful photography with the AE-1 Program.
Metering Modes Explained
The Canon AE-1 Program offers several metering modes, detailed within its instruction manual, to assist in achieving correct exposure. These include averaging metering, which evaluates the entire scene to determine exposure, and spot metering, allowing users to meter from a very small area of the frame – approximately 3.5% of the viewfinder area.
The manual emphasizes the importance of selecting the appropriate metering mode based on the shooting situation. For example, spot metering is ideal for high-contrast scenes where averaging might be misled. The AE-1 Program also features a center-weighted average metering mode, giving more importance to the center of the frame. Understanding how each mode interprets light is crucial, and the manual provides clear explanations and examples to guide users towards optimal exposure settings.
Focus Lock and Recomposition
The Canon AE-1 Program’s instruction manual details the “focus lock and recompose” technique, a common practice for achieving precise focus with off-center subjects. This involves initially focusing on the subject while the active focus point is centered, then locking the focus by partially depressing the shutter button.
Maintaining that pressure, the photographer can then recompose the shot, moving the camera to frame the subject as desired. The manual cautions that significant recomposition can slightly alter the focal plane, potentially leading to a shallow depth of field and a slightly out-of-focus subject. It suggests practicing this technique to understand its limitations and achieve consistently sharp results, especially when using wider apertures.
Depth of Field Control
The Canon AE-1 Program’s manual thoroughly explains depth of field (DOF) and its control, crucial for creative image making. DOF, the area appearing acceptably sharp, is influenced by aperture, focal length, and subject distance. Smaller apertures (higher f-numbers like f/16) yield greater DOF, ideal for landscapes where sharpness throughout the scene is desired.
Conversely, larger apertures (lower f-numbers like f/2;8) create shallow DOF, effectively isolating the subject against a blurred background – perfect for portraits. The manual illustrates how focal length impacts DOF; longer lenses produce shallower DOF than wider lenses at the same aperture and distance. Understanding these relationships allows photographers to intentionally manipulate DOF for artistic effect, guided by the AE-1 Program’s precise controls.

Using Accessories
The Canon AE-1 Program manual details compatible lenses, flash units, remote shutter releases, and filters, enhancing photographic versatility and creative control.
Compatible Lenses
The Canon AE-1 Program utilizes the Canon FD lens mount, a bayonet-style system renowned for its robust build and optical quality. The instruction manual comprehensively lists compatible lenses, spanning a wide range of focal lengths and apertures. These include standard 50mm lenses, wide-angle options for landscapes, and telephoto lenses for wildlife or sports photography.
FD lenses are categorized into two main types: those with electrical contacts for aperture control from the camera body, and older, non-electronic versions requiring manual aperture adjustment. Adapters exist to use other lens mounts with the AE-1 Program, but compatibility and functionality may vary. The manual emphasizes using Canon FD lenses to ensure optimal performance and full feature access, maximizing the camera’s potential.
Flash Photography with the AE-1 Program
The Canon AE-1 Program offers versatile flash photography capabilities, detailed within the instruction manual. It’s compatible with Canon Speedlites, utilizing both automatic and manual flash modes. Automatic mode allows the camera to calculate the appropriate flash exposure, simplifying operation for beginners. Manual mode provides full control over flash power, ideal for creative lighting effects.
The manual explains how to utilize the camera’s hot shoe for direct flash connection and outlines settings for various shooting scenarios. It also covers using off-camera flash with appropriate accessories. Proper flash synchronization is crucial, and the manual clarifies the shutter speed limitations to avoid dark bands in images. Understanding these settings ensures well-exposed and creatively lit photographs.
Remote Shutter Release
The Canon AE-1 Program supports a remote shutter release, enhancing stability for long exposures and minimizing camera shake. The instruction manual details its connection point, typically a two-pin socket located on the camera body. Using a remote release is particularly beneficial for landscape photography, night scenes, or any situation requiring prolonged shutter speeds.
The manual explains different types of remote releases – cable releases and electronic releases – and their respective advantages. Cable releases offer a simple, mechanical connection, while electronic releases provide more advanced features like delayed firing. Proper use prevents unwanted camera movement, resulting in sharper images. The guide clarifies how to activate the remote and ensure correct synchronization with the camera’s shutter mechanism.
Filters and Lens Adapters
The Canon AE-1 Program’s lenses accept various filters, enhancing creative control and image quality. The instruction manual details filter sizes, typically 58mm, and their mounting procedure. Filters include UV, polarizing, and neutral density options, each serving a distinct purpose – UV protects the lens, polarizers reduce glare, and ND filters allow for wider apertures in bright light.
Lens adapters expand compatibility beyond Canon’s FD mount, enabling the use of lenses from other manufacturers. The manual cautions about potential limitations with autofocus and metering when using adapters. Careful selection and proper installation are crucial to avoid damage. It emphasizes checking adapter compatibility before purchase and following the guide’s instructions for secure attachment, ensuring optimal performance and preventing lens misalignment.

Maintenance and Troubleshooting
The Canon AE-1 Program manual guides users through cleaning, battery replacement, and resolving common issues, alongside repair service location information.
Cleaning the Camera Body and Lens
Maintaining your Canon AE-1 Program’s pristine condition is crucial for optimal performance. The instruction manual details a gentle cleaning process for both the camera body and its lenses. For the body, use a soft, dry cloth to wipe away dust and fingerprints, avoiding harsh chemicals or abrasive cleaners. Pay particular attention to the film compartment and viewfinder window.
Lens cleaning requires even more care. Begin by using a blower brush to remove loose particles. Then, employ lens cleaning tissue and a dedicated lens cleaning solution – never use household cleaners! Apply a small amount of solution to the tissue, not directly onto the lens, and gently wipe in a circular motion. Inspect for streaks and repeat if necessary. Proper cleaning ensures clear, sharp images and prolongs the life of your valuable equipment, as outlined in the comprehensive manual.
Battery Replacement
The Canon AE-1 Program relies on a 4LR44 or equivalent 6V battery to power its electronic functions, as detailed within the instruction manual. Battery replacement is straightforward, located within a compartment on the camera’s bottom. Ensure the camera is turned off before proceeding. Gently slide open the battery compartment cover, typically with a small latch or release mechanism.
Remove the old battery, noting its correct polarity (+ and -). Insert the new battery, aligning the terminals correctly. Securely close the battery compartment cover. The manual emphasizes using quality batteries for reliable performance. A weak battery can cause inaccurate metering or failure of electronic features. Regularly check battery levels, especially during extended use, to avoid interruptions during important shooting sessions. Proper battery maintenance is key to consistent operation.
Common Problems and Solutions
The Canon AE-1 Program, while robust, can encounter issues. A common problem is inaccurate metering, often due to a weak or incorrect battery – ensure a fresh 4LR44 is installed. If the shutter doesn’t fire, check the battery again and verify the film is correctly loaded and advancing. Sticky shutter curtains can occur with infrequent use; professional cleaning is recommended.
Light leaks might indicate a faulty light seal, requiring replacement. The instruction manual doesn’t cover repairs, but online resources and repair services are available. Erratic behavior could stem from corrosion in the battery compartment; clean contacts carefully. If the film advance is stiff, avoid forcing it. Seeking professional assistance is advisable for complex issues to prevent further damage and maintain the camera’s functionality.
Where to Find Repair Services
The Canon AE-1 Program, being a vintage camera, requires specialized repair expertise. While Canon no longer directly services these models, numerous independent repair shops specialize in classic film cameras. Online searches for “Canon AE-1 Program repair” will yield local options and mail-in services.

Reputable repair technicians can address issues like light leaks, shutter problems, and meter calibration. Websites like KEH Camera and other used camera dealers often offer repair services alongside their sales. The Internet Archive’s service manual (central-manuals-camera_canon_Ae1p_SM.pdf) can aid technicians, but isn’t a DIY guide. Expect repair costs to vary based on the complexity of the issue. Thoroughly research any repair service before entrusting them with your valuable AE-1 Program.